
Cheese Yaki Onigiri Recipe – Crispy, Cheesy Japanese Grilled Rice Balls
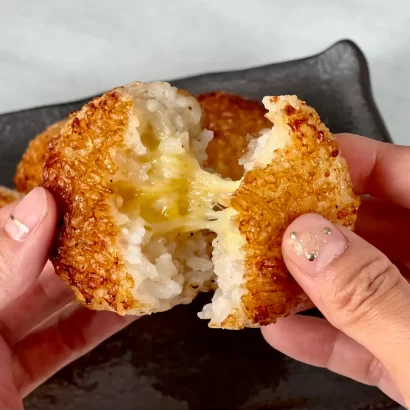
If you’re a fan of crispy, golden-brown rice with a gooey, melty cheese center, then this cheese yaki onigiri recipe is just what you need. These Japanese grilled rice balls combine the satisfying crunch of traditional yaki onigiri with the rich, savory goodness of cheddar cheese and umami-packed bonito flakes.
Perfect as a snack, appetizer, or addition to a bento box, yaki onigiri with cheese takes the classic Japanese comfort food to the next level. The combination of crispy rice, smoky soy sauce, and warm, melted cheese makes these rice balls irresistible. Whether you’re new to onigiri or looking for a fun way to elevate this beloved dish, this yaki onigiri cheese variation is sure to impress.
In this blog, we’ll walk through everything you need to know about how to make yaki onigiri with cheese—from selecting the right rice to grilling techniques that ensure a perfectly crisp crust every time.
Jump to RecipeWhat Is Yaki Onigiri?
Yaki onigiri is a grilled version of Japan’s popular rice ball, onigiri. Unlike traditional onigiri, which is usually eaten plain or wrapped in nori (seaweed), yaki onigiri is pan-seared or grilled, often with a light soy sauce glaze that gives it a crispy and flavorful exterior.
Adding cheese to the mix transforms the traditional yaki onigiri recipe into a comforting and indulgent treat. The heat from grilling melts the cheese inside, creating a creamy contrast to the crispy rice shell. This yaki onigiri cheese version is especially popular among those who love fusion flavors and a bit of extra richness in their Japanese snacks.
Why You’ll Love This Cheese Yaki Onigiri Recipe
- Crunchy Outside, Gooey Inside – The contrast of crispy rice and melted cheese makes every bite satisfying.
- Packed with Umami – Bonito flakes and soy sauce infuse the rice with deep savory flavors.
- Perfect for Bento Boxes & Snacks – These cheesy rice balls are great for meal prep and easy to pack for lunch.
- Customizable – Try different cheeses, seasonings, or even spicy variations to match your taste.
Ingredients for Cheese Yaki Onigiri
To make the best yaki onigiri with cheese, you’ll need just a few simple ingredients:
1. Sushi Rice – Short-grain or medium-grain rice works best for shaping and holding together.
2. Water – Essential for cooking the rice to the right consistency.
3. Katsuobushi (Bonito Flakes) – Adds an umami boost to the rice mixture.

4. Cheddar Cheese – Melts beautifully inside, adding a creamy texture.

5. Soy Sauce – Provides a savory, slightly smoky flavor when grilled.

Optional Additions:
- Spicy Kick – Add chili flakes or a drizzle of spicy mayo.
- Extra Crunch – Sprinkle sesame seeds before grilling.
- Different Cheese Options – Try mozzarella for a stretchy effect or parmesan for a sharper taste.
How to Make Yaki Onigiri with Cheese
Making yaki onigiri cheese at home is simple, but getting the perfect crispy crust while keeping the rice intact requires a few key techniques. Follow these steps for the best results:
Step 1: Cook the Sushi Rice

- Rinse the rice 3–4 times until the water runs clear to remove excess starch.
- Combine the rice and water in a pot or rice cooker and let it soak for 30 minutes before cooking.
- Bring to a boil over medium-high heat, then reduce to the lowest setting and simmer for 12 minutes.
- Turn off the heat and let the rice steam for 10 minutes with the lid on.
Step 2: Prepare the Rice Mixture
- Fluff the rice with a paddle and allow it to cool slightly.
- Mix the soy sauce and bonito flakes together, then stir them into the rice.
- Fold in the shredded cheddar cheese, distributing it evenly.
Step 3: Shape the Onigiri
- Wet your hands with warm water and coat them lightly with kosher salt to prevent sticking.
- Take a handful of rice (about ⅓ cup) and press it into a triangle shape, ensuring the cheese is tucked inside.
- Place each yaki onigiri with cheese on a parchment-lined tray.
Step 4: Grill the Yaki Onigiri
- Preheat an oven to 480°F (250°C).
- Brush the rice balls lightly with soy sauce for extra flavor.
- Bake for about 15 minutes, flipping halfway through to get an even golden-brown crust.
- Serve immediately while the cheese is warm and gooey.
Tips for the Best Cheese Yaki Onigiri

- Use the Right Rice – Short-grain sushi rice is ideal because it sticks together without falling apart.
- Don’t Overwork the Rice – Gently press it into shape to keep the texture light and fluffy.
- Brush with Extra Soy Sauce – This enhances the umami and creates a richer crust.
- Reheat Properly – If storing leftovers, reheat in an oven at 350°F (175°C) for 5 minutes instead of microwaving, which can make them soggy.
Serving Suggestions for Yaki Onigiri with Cheese
This cheese yaki onigiri recipe pairs well with a variety of Japanese side dishes and dipping sauces:
- Miso Soup – Complements the savory flavors of the onigiri.
- Pickled Vegetables – Adds a refreshing contrast.
- Japanese Mayo or Sriracha Mayo – A great dipping sauce for an extra creamy kick.
- Grilled Meats or Seafood – Serve alongside yakitori or teriyaki salmon for a full meal.
Common Questions About Cheese Yaki Onigiri
1. Can I use a different type of cheese?
Yes! While cheddar works great for its sharp flavor and melting properties, you can also try mozzarella (for a stretchier texture), gouda, or even parmesan for a stronger taste.
2. Can I make yaki onigiri cheese ahead of time?
Yes, you can prepare the rice balls and refrigerate them for up to two days. Reheat them in the oven to regain their crispiness before serving.
3. Can I pan-fry instead of baking?
Absolutely! Heat a nonstick pan over medium heat and sear the onigiri on each side until golden brown and crispy.
4. Can I add fillings besides cheese?
Definitely! Try adding cooked tuna, spicy cod roe (mentaiko), or even sautéed mushrooms for a different flavor twist.
Cheese Yaki Onigiri
Equipment
- Small Rice Bowl or Onigiri Mold: To shape the onigiri.
- Rice Cooker or Pot with Lid: For cooking the sushi rice.
- Oven or Grill: To crisp up the onigiri.
- Parchment Paper: To prevent sticking while shaping the rice balls.
- Basting Brush (Optional): For evenly applying the soy sauce glaze.
Ingredients
- 2 cups sushi rice
- 2 pkts Katsuobushi Bonito Flakes
- 5 oz cheddar cheese shredded
- 1 tbsp soy sauce
- 2 cups water
Instructions
- Rinse the rice, 3 to 4 times
- Add 2 cups of water to rice in the pot, cover the pot with its lid, and let rest for 30 minutes.
- Bring the heat to medium high to boil.
- Turn down the heat to the lowest temperature for 12 minutes.
- Turn off the pot, keep its lid on and let steam for 10 minutes.
- Fluff the rice with paddle.
- Replace the lid and let cool down until warm.
- Once warm, mix soy sauce and bonito flakes together.
- Add soy/bonito mixture to rice and shredded cheddar.
- Using wet hands coated with ¼ tsp of kosher salt, begin to shape the rice into triangles.
- Place the triangles done on parchment paper.
- Place into a 480-degree oven for 15 minutes.
Notes
Customizations:
- Extra Crispy: Brush with extra soy sauce before baking.
- Spicy Cheese Onigiri: Add chili flakes or spicy mayo inside.
- Different Cheese Options: Try mozzarella for a stretchier texture or parmesan for a sharper flavor.
Storage Tips:
- Store leftovers in an airtight container for up to 2 days in the refrigerator.
- Reheat by baking at 350°F (175°C) for 5 minutes or microwaving for 30 seconds.
Serving Tips:
- Serve with miso soup, pickled vegetables, or a dipping sauce like Japanese mayo.
- Pair with grilled meats or seafood for a complete meal.
Cooking Tips:
- Wet hands with warm water and coat with a pinch of kosher salt before shaping to prevent sticking.
- Press the cheese slightly into the rice when shaping to keep it from oozing out too quickly while cooking.
Nutrition
Chef B Final Thoughts on Cheese Yaki Onigiri
This cheese yaki onigiri recipe brings a fun and indulgent twist to traditional Japanese grilled rice balls. With its crispy exterior and gooey, melty cheese center, it’s a must-try for anyone who loves Japanese flavors with a comforting, cheesy upgrade.
Whether you enjoy yaki onigiri with cheese as a snack, a side dish, or part of a bento box, it’s a simple yet satisfying treat that will quickly become a favorite. Try it today and experience the delicious combination of crispy rice and melty cheese for yourself!
Tried this recipe? Don’t forget to share your success stories and tag us in your cheese yaki onigiri pics!

Hi, I’m Chef B! Passionate about all things culinary, I’ve spent years perfecting my recipes to bring bold flavors to your kitchen. Let’s cook up something delicious together!