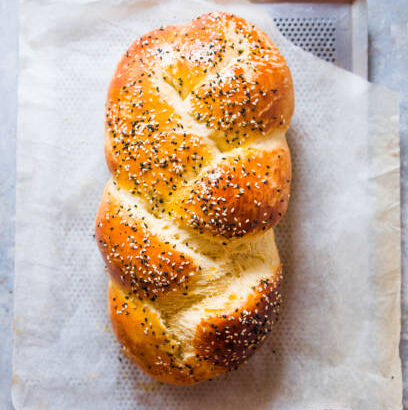
Simple Sweet Challah Bread is a classic Jewish bread recipe that is soft, slightly sweet, and incredibly versatile. This recipe is perfect for both novice and experienced bakers, guiding you step-by-step through the process of creating a beautifully braided loaf. Whether you’re enjoying it fresh out of the oven, making French toast, or serving it as garlic bread, this challah is sure to impress with its soft texture and subtly sweet flavor.
The combination of bread flour and all-purpose flour ensures a balanced texture—firm enough to hold its shape when braided yet light and feathery when baked. The richness of eggs and butter is complemented by the natural sweetness of honey, making this bread a delightful addition to any meal. Each slice is tender and aromatic, perfect for breakfast, brunch, or even dinner.
This recipe is designed for convenience and flexibility. It uses common kitchen tools like a stand mixer with a paddle attachment (or you can mix by hand), a mixing bowl, a microwave-safe bowl for prepping, a spatula, and a half-sheet pan lined with parchment paper. These tools make preparation and cleanup easy, ensuring you can focus on the joy of baking.
The baking process involves two proofing periods to allow the dough to rise to perfection. A warm oven is suggested for proofing, ensuring optimal results. The bread is carefully braided for an elegant presentation, and a simple egg wash adds a glossy finish, giving it that signature challah bread look.
Baking tips are included to help you achieve the best results, such as delaying the egg wash application until the loaf is partially baked to prevent over-browning. Additionally, using a foil tent during the last 10 minutes of baking helps maintain the loaf’s golden hue without overcooking the crust.
Not only does this recipe make a stunning centerpiece for holiday meals or Shabbat dinners, but it also transforms into an indulgent treat when used for French toast or other creative dishes. With straightforward instructions and accessible ingredients, this sweet challah bread recipe will quickly become a household favorite.
What Makes Challah Bread Special?
Challah bread is deeply rooted in Jewish culture and is traditionally served during Sabbath and holiday meals. Its signature braid makes it a stunning centerpiece for any table, while its slightly sweet flavor pairs beautifully with savory or sweet accompaniments. This recipe captures the essence of a classic challah loaf while being easy enough for beginner bakers to master.
Why You’ll Love This Recipe
- Simple Ingredients: This recipe uses pantry staples like flour, eggs, honey, and butter, making it accessible and budget-friendly.
- Soft and Sweet: The bread’s tender crumb and subtle sweetness make it versatile for meals or desserts.
- Perfect for Beginners: The detailed instructions ensure anyone can achieve a beautifully braided loaf.
- Endlessly Customizable: Add raisins, chocolate chips, or fresh herbs to create your own twist on this classic bread.
Tips for Baking the Perfect Challah Bread
- Activate Your Yeast Correctly: Start with warm water (110°F–120°F) to activate the yeast. If the water is too hot, it may kill the yeast, and if it’s too cold, the yeast won’t activate properly.
- Master the Braid: Don’t be intimidated by the braid! Practice makes perfect, and even if it’s not flawless, your bread will still taste incredible.
- Egg Wash Timing: Apply the egg wash about 10–12 minutes into baking to avoid over-browning. This will give your loaf a golden, shiny crust.
- Let It Cool: As tempting as it may be, allow the bread to cool slightly before slicing. This helps retain moisture and ensures the crumb stays soft.
Creative Ways to Use Challah Bread
- French Toast: The soft, slightly sweet crumb makes challah perfect for soaking up a rich custard for French toast.
- Sandwiches: Use challah to elevate your favorite sandwich, whether it’s savory or sweet.
- Bread Pudding: Day-old challah is excellent for turning into a decadent bread pudding.
- Garlic Bread: Brush slices with garlic butter and toast for an irresistible side dish.
Step-by-Step Overview of the Recipe
This recipe combines a few key steps that ensure your challah comes out perfect every time:
- Activate the Yeast: Combine yeast, sugar, and warm water to create a foamy, bubbly mixture that sets the foundation for your bread.
- Mix the Dough: Add eggs, honey, and melted butter to the yeast mixture, followed by flour. Mix until the dough is soft, smooth, and slightly sticky.
- Proof the Dough: Let the dough rise in a warm, draft-free spot until it doubles in size.
- Shape and Braid: Divide the dough into equal parts, roll into ropes, and braid. This gives the bread its classic look.
- Bake to Perfection: Bake at 350°F until the bread is golden brown and smells heavenly.

Simple Sweet Challah Bread
Equipment
- Stand Mixer with Paddle Attachment: For mixing and kneading the dough efficiently.
- Mixing Bowls For activating the yeast and proofing the dough.
- spatula For scraping the bowl and folding the dough.
- Microwave-Safe Bowl: For warming the bowl and melting butter.
- Half-Sheet Pan: For baking the braided loaf.
- Parchment Paper: Essential for preventing the bread from sticking to the pan.
- Plastic Wrap: For covering the dough during proofing.
- pastry brush For applying the egg wash.
Ingredients
- 1 cup bread flour
- 2 cups all-purpose flour
- 2 large eggs
- 2 egg yolks reserve the whites foe egg wash
- ½ cup honey up to ¼ cup more if you want it super sweet
- 1 tbsp kosher salt
- 4 tsps active yeast about 2 packets
- 1 cup hot water about 110 to 120 degrees
- 1 stick salted butter about 8 tablespoons
- ⅓ cup sugar
Instructions
- Start by letting your mixing bowl get warm by running it under hot water for a minute and then drying it off before adding anything into it.
- Dump the cup of hot water, sugar, and yeast into the bowl and mix them up by hand and let sit in a warm place for 10 minutes until foamy. (This activates the yeast.)
- In another bowl, mix the whole 2 eggs and the 2 egg yolks with salt an honey until well-incorporated and let sit while the yeast gets going. Save the egg whites for the egg wash.
- After 10 minutes, add the melted butter to the yeast mixture and stir by hand. Then add the honey-egg mixture and give it a good stir by hand until you feel no honey stuck to the bottom of the bowl.
- This is where the stand mixer comes in handy. Attach the bowl to the stand and add 1 cup of bread flour and stir on medium-low with the paddle attachment until smooth-ish. Repeat with 1 cup of all-purpose flour, again with bread flour, and one more time with all-purpose flour.
- After all the flour has been mixed in, scrape the bowl with a spatula and let it go on medium for about a minute. It should be sticky and the dough should be loose and feathery. If it is too runny (depending on climate), add ¼ cup more of all-purpose flour and mix one more time and you should be good to go.
- Microwave a large glass mixing bowl and coat completely with vegetable oil, then add the dough and toss it around a couple times until it’s also coated with oil. Loosely cover with a plastic wrap and let sit in a warm, draft-free place. (I like to use a lightly warmed oven. I’d turn it on the warm setting for a few minutes and then turn it off before putting the bowl in there.) Now, let the dough sit in there for 1 hour, no less.
- Then take it out, punch it down, and dump onto a clean, floured work surface to braid. I like to toss it in the flour a little to make it a little less sticky before attempting to braid, it makes a smaller mess. After getting it nicely coated with flour, cut into 3 equal parts for one loaf, or 6 equal parts for 2 loaves. Then roll out to about a 2-inch diameter and braid each. Once braided, pinch and tuck the ends under to make it pretty.
- Now put it onto whatever pan you’re using to make it. A half sheet pan works nicely for a full loaf or baking both small loaves at once. Put a piece of parchment paper on the pan (very necessary, trust me) and put the bread in the middle. Put it back into the oven for another 45 minutes to an hour to rise.
- Remove the bread and heat the oven to 350°. Once heated, bake the bread on the middle/top rack. Here’s a little trick of mine: The bread bakes for 30 minutes in total, however, I do not apply the egg wash until it has baked for 10 to 12 minutes. This keeps it from getting too brown. Another thing, I do right when it hits the color I want (which is about 20 minutes. I rotate the pan and cover loosely with a foil tent. This stops the browning but allows the bread to remain nice, shiny, and beautiful. After 30 minutes, take it out and remove from the pan, but leave it on the parchment paper for 10 minutes before you tear, slice, or anything. It keeps the bread more moist. Enjoy!
Notes
- I used a stand mixer in this recipe but it can easily be done by hand or with a stand mixer.
- It also makes AMAZING French toast, garlic bread…whatever! ^_^
Customizations:
- Sweetness Level: Add an extra ¼ cup of honey for a sweeter loaf.
- Flavor Variations: Mix in raisins or chocolate chips for a festive touch.
- Savory Twist: Add fresh herbs like rosemary or thyme to balance the sweetness.
Storage Tips:
- Store in an airtight container at room temperature for up to 3 days.
- Freeze slices in plastic wrap and foil for up to 3 months.
Serving Suggestions:
- Serve fresh with butter and jam for breakfast.
- Pair with soups or stews as a side.
- Use for sandwiches or as the base for decadent French toast.
Cooking Tips:
- Ensure the water for activating yeast is between 110°F and 120°F.
- Proof the dough in a warm, draft-free area for optimal rising.
- Apply the egg wash after partial baking to avoid over-browning.
Nutrition
Common Questions About Challah Bread
Q: Can I make this bread without a stand mixer?
Absolutely! While a stand mixer makes the process faster, you can knead the dough by hand. Just ensure you knead it thoroughly for about 10–12 minutes.
Q: How long does challah bread stay fresh?
Challah stays fresh for up to 3 days when stored in an airtight container. You can also freeze it for up to 3 months.
Accordion title 1
This is a placeholder tab content. It is important to have the necessary information in the block, but at this stage, it is just a placeholder to help you visualise how the content is displayed. Feel free to edit this with your actual content.
Accordion title 2
This is a placeholder tab content. It is important to have the necessary information in the block, but at this stage, it is just a placeholder to help you visualise how the content is displayed. Feel free to edit this with your actual content.
Q: Can I make it dairy-free?
Yes! Substitute the butter with margarine or a neutral oil, and you’ll have a dairy-free version of this delicious bread.
Simple Sweet Challah Bread is more than just a recipe; it’s an experience. The act of braiding the dough, the smell of honey and butter filling your kitchen, and the joy of slicing into a warm, golden loaf make this bread a joy to bake and share. Whether you’re new to baking or a seasoned pro, this recipe is a must-try.
Start your challah-making journey today, and bring a taste of tradition and sweetness to your table. Your friends and family will thank you!
Looking for more bread recipes? Explore our collection for more homemade favorites that will elevate your baking game.

Hi, I’m Chef B! Passionate about all things culinary, I’ve spent years perfecting my recipes to bring bold flavors to your kitchen. Let’s cook up something delicious together!


